Hi all, another Tuesday and my inspiration today came from a drawn image in my "Smash Book" of ideas. I don't know where it originally came from but I have a big note to myself to use a MS punch called Cherish. This is a free standing card supported by the side flaps.
I am using an image from the November release of the Little Cottage Cuties Collection called SugarPlum Faery", illustrated by Elisabeth Bell for Whimsy Stamps.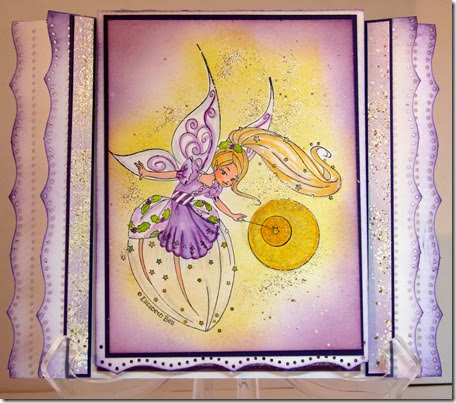
This card looks very sparkly in real life as I used my favorite Sakura Stardust Pen and Shabby White Frantage. If you haven't tried using Frantage -- it is something to put on your list.
Materials used: White Lynx Cardstock, Memento Ink, SugarPlum Faery" stamp, Copic Markers: Skin: R00, E02, R20, Hair: E40, E42, E31, YR31, Other: V04, V05, V01, V17, Y06, Y18,YG03, G20. Ranger Distress Inks (Squeezed Lemonade, Dusty Concord), Versamark, Shabby White Frantage, MS Cherish punch, Sakura Stardust Pen, DP (Basic Grey - Plumeria), Perfect Plum ink and Elegant Eggplant C/S.
I started with 2 sheets of white cardstock cutting each in half at 5 1/2". a,b,c,d cut in the following lengths.
a) 5 1/2" x 7 1/4" - Score at 1 1/2" and 5 5/8" - Border punch - this will leave a center section of 4 1/8".
b) 5 1/2" x 6 1/4" - Score at 1" and 5 1/8" - Border punch - leaving a 4 1/8" center section.
c) 4 1/16" x 8 1/2" - Score at 5 1/2" (This becomes the front flap that holds the image) - Border punch the edge of the largest section.
All edges were sponged with Dusty Concord Distress Ink.
d) Used for stamped image. After my image was stamped, I stamped another image onto Post It, masked my image and sponged all around the image with Squeezed Lemonade, then randomly sponged versamark to sprinkle Frantage onto. Heat set the Frantage from the underside and brushed off any excess. Sponged Perfect Plum around image. The image was cut 1/2" smaller than the inside panel of the card, matted and adhered to the front flap.
a is the back of the card, c (the shortest section) is adhered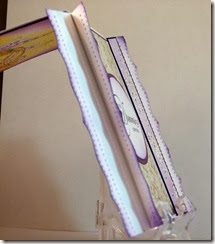 to the center section of a. b is then adhered only at the center section to a and c. The flap with the image attached flips down.
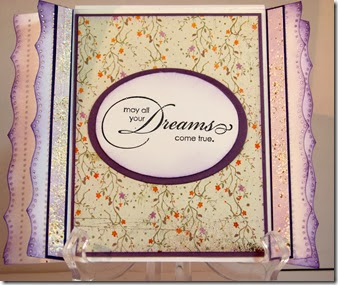
I added a matted sentiment over DP and Cardstock. To add some bling to the sides, I sponged and frantaged strips and adhered them to a thin mat.
I hope my card has inspired you to stamp up a storm and ink up a wish and send it on to someone to make their day.
Rubber hugs and Whimsy wishes,

I am using an image from the November release of the Little Cottage Cuties Collection called SugarPlum Faery", illustrated by Elisabeth Bell for Whimsy Stamps.

This card looks very sparkly in real life as I used my favorite Sakura Stardust Pen and Shabby White Frantage. If you haven't tried using Frantage -- it is something to put on your list.
Materials used: White Lynx Cardstock, Memento Ink, SugarPlum Faery" stamp, Copic Markers: Skin: R00, E02, R20, Hair: E40, E42, E31, YR31, Other: V04, V05, V01, V17, Y06, Y18,YG03, G20. Ranger Distress Inks (Squeezed Lemonade, Dusty Concord), Versamark, Shabby White Frantage, MS Cherish punch, Sakura Stardust Pen, DP (Basic Grey - Plumeria), Perfect Plum ink and Elegant Eggplant C/S.
I started with 2 sheets of white cardstock cutting each in half at 5 1/2". a,b,c,d cut in the following lengths.
a) 5 1/2" x 7 1/4" - Score at 1 1/2" and 5 5/8" - Border punch - this will leave a center section of 4 1/8".
b) 5 1/2" x 6 1/4" - Score at 1" and 5 1/8" - Border punch - leaving a 4 1/8" center section.
c) 4 1/16" x 8 1/2" - Score at 5 1/2" (This becomes the front flap that holds the image) - Border punch the edge of the largest section.
All edges were sponged with Dusty Concord Distress Ink.
d) Used for stamped image. After my image was stamped, I stamped another image onto Post It, masked my image and sponged all around the image with Squeezed Lemonade, then randomly sponged versamark to sprinkle Frantage onto. Heat set the Frantage from the underside and brushed off any excess. Sponged Perfect Plum around image. The image was cut 1/2" smaller than the inside panel of the card, matted and adhered to the front flap.
a is the back of the card, c (the shortest section) is adhered
 to the center section of a. b is then adhered only at the center section to a and c. The flap with the image attached flips down.
I added a matted sentiment over DP and Cardstock. To add some bling to the sides, I sponged and frantaged strips and adhered them to a thin mat.
I hope my card has inspired you to stamp up a storm and ink up a wish and send it on to someone to make their day.
Rubber hugs and Whimsy wishes,


